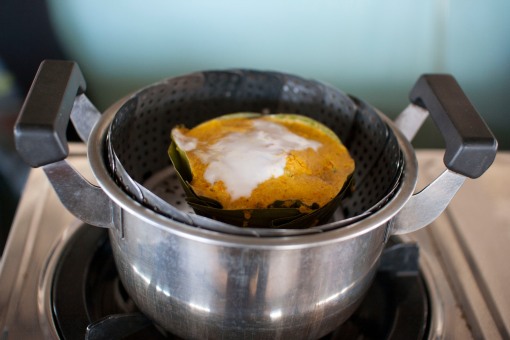
Fish Amok

On Monday I decided to attend a Cambodian cooking class. This is something I’ve been wanting to do for some time… since December 2009, actually, when a friend first suggested it. The class took place at a property owned by the restaurant Frizz on Street 240.

We kicked off the day at 9am for a quick tour of common Cambodian cooking ingredients at one of the better vegetable markets in town, Kandal market. It’s a place that I’ve been to a number of times, so it wasn’t really that exciting for me, but the class is geared toward tourists and not… locals, so I didn’t complain.

Our class was lead by a young guy named Heng (or was it Keng?) who had actually gone through the horeca training program at Friends International. He was a pretty vibrant guy who spoke English relatively well, and knew a fair bit about the culinary history of Cambodia.

After our market tour with Heng, we headed back to our kitchen, an open-air facility on the second floor of a building behind the restaurant. The first thing on the menu was Cambodian spring rolls (chaio yor).

Now, I’ve been particularly curious about Cambodian spring rolls, because I asked our former maid to make some for us when I first arrived in Cambodia this summer, and she weaseled her way out of it twice, claiming that they were very difficult to make. By the end of this class however, I determined that the maid was definitely not made a former maid in error. Cambodian spring rolls are super easy.

Basically, it involves two cups of grated taro root (coco yam) and 2 cups of grated carrot. The most involved step is taking the starch out of the taro, which is easily done by sprinkling about a tablespoon of salt onto the yam and gently squeezing and working the yam for about 3-5 minutes until the moisture is drawn out of the yam.

Next, we spiced the spring roll filling with some sugar and ground black pepper and about a tablespoon of ground peanut.

The next step was to roll the spring rolls… very straightforward, we just used a beaten egg to seal the rolls, and took care to make them as tight as possible, so as to keep them from soaking up too much oil when they are fried.

After that, we fried the spring rolls in about 3 cups of cooking oil inside of a wok, until they were golden brown.
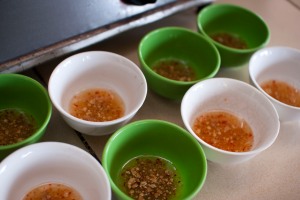
As for the dipping sauce, it’s just a variation of nuoc cham, with the very same ingredients, so see my previous entry for details.

The next thing on the menu was the fish amok. While there is a great overlap between Cambodian, Thai and Vietnamese food, fish amok is one of those dishes that is very, very Cambodian. It’s a quick favourite among visitors and expats alike, because of the sweet taste of the coconut milk and cream in the amok.

Oddly enough, the recipe featured in the cookbook we were given is different from the recipe we used in the class, so I’m going off the top of my head for some of the quantities. In any case, here goes:
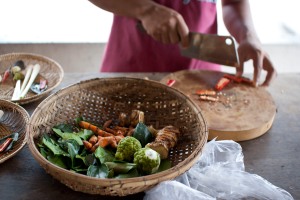
Kroeung (herb paste)

-10 dried red chilies (the non spicy, larger variety) soaked, drained and chopped into a paste.

-4 cloves garlic

-3 tbsp of galangal (cut small) … if you can’t find galangal, use ginger root

– 8 thinly sliced lemongrass stalks (outer leaves and lower part of bulb removed–chop starting at the bulb end, and chop about one-third of the length of the stalks, and discard the rest)

-zest of 1/3 kaffir lime

-1 tsp salt

-2 tbsp of chopped fresh turmeric

-1  to 3 sliced bird’s eye chilies, depending on how much heat you want

-1 small shallot

Directions:

Combine all the ingredients in a food processor (or mortar) and blend to a thick paste.

Amok – Serves 4

-kroeung

–3 tbsp fish sauce

-3 tbsp kaffir lime leaves

-3 chili peppers

-500g snakehead fish (trei ros), or any meaty white fish…

-2 cups coconut milk

-3/4 cup coconut cream

-1 egg, beaten

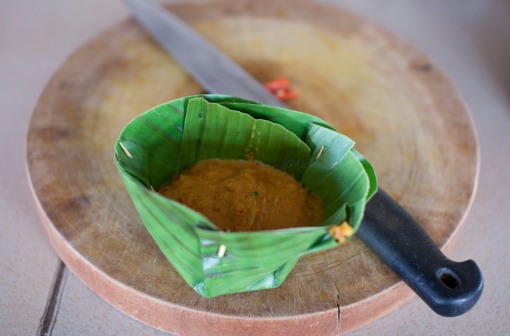
-8 banana leaves (might be smart to buy extras, especially the first time)

Making the banana cup:

First, clean the leaves with a wet cloth, then dip them into boiling water so they are soft and do not crack when being shaped.

Cut the leaves into circles about 25cm in diameter and place two together, with the shiny sides facing outward.

Make a square in the middle of the circle, this will be the bottom of the cup.

Then, put a thumb on one right angle of the square and pull up two sides, tucking the fold, and pinning together with a tiny bamboo stick, toothpick, or stapler.

Repeat this four times, so that the cup has five equally spaced folds.

The rest of the amok:

Slice the fish thinly and set aside. Stir the kroeung into 1 cup of coconut milk. When it has dissolved, add the egg, fish sauce and sliced fish. Then add the remaining coconut milk and mix well.

Divide the mixture evenly among the four banana leaf cups and steam for 15-20 minutes, then put the coconut cream on top, as well as the kaffir leaves (thinly sliced) and thinly sliced sweet chili pepper for garnish. Steam further until the mixture is solid, but still moist.

Serve with rice, and enjoy!!


bún thịt nướng chả giò

Today’s entry is devoted to one of my favourite Asian dishes, and certainly my favourite Vietnamese dish, bún thịt nướng chả giò—cold vermicelli noodles served with grilled marinated pork, spring rolls, julienned carrots and cucumber, shredded lettuce, and of course nuoc cham!

I’ve been making this dish for a few years now, ever since I first tried it in university. I think what makes it really delicious is the use of lemongrass to marinate the pork. When you have fresh ingredients, this dish can really shine!

I use this recipe as my base, although I often omit the mint and cilantro, and add in lemonrass. As I said, before, the key to this recipe is the lemongrass. I usually chop up my pork (I used pork chop last time, with the fat trimmed), add in the shallots, garlic, oil, fish sauce and lime juice as the recipe says. Then I grate about 6 or 7 inner stalks of lemongrass. This ratio usually works for a half pound of meat, but if you are following the recipe’s quantities, make sure to double the lemongrass. If you don’t have access to fresh lemongrass, dried powdered lemongrass will do as a substitute. I usually omit the salt because the fish sauce we use (Thai) has a lot of salt in it already, and I tend to marinate my pork for at least 2-3 hours, so the flavour really sinks in without any extra sodium.

Next, I tackle the nuoc cham–fish sauce-based dipping sauce. The recipe on the site works well for me. I usually add extra garlic, and don’t bother with the carrots, although sometimes I will chop up some green onions for garnish. This time around, I didn’t have any chili peppers, so I used bird’s eye chilis… tiny chilis that really pack a much stronger punch. The longer the chilis sit in the sauce, the hotter the sauce gets, so after about 10 minutes, I strained the nuoc cham and put it in the fridge.

While that’s sitting in the fridge, I julienne/chop all my veggies, crush my peanut, and chop up some green onions for garnish. Pretty straightforward.

After a few hours in the fridge, or 30 minutes on the countertop if you’re in a hurry, cook the pork. The easiest way to do it is in a wok, although it takes a bit of time to dry out the pork just right. If you have access to a grill, especially a charcoal one, grill your pork on there for a nice smoky flavour.

Until recently, that was the extent of the dish for me when I cooked it at home, but this time around I decided to go one step further and add the cha gio — spring rolls.

I didn’t really follow a recipe for making spring rolls… nor did I write down the quantities of what I put in. Basically I made something similar to this, except that I used king oyster mushrooms instead of shiitake (less flavourful, but that’s what I had in the fridge), pork chop instead of ground pork, and vermicelli noodles instead of bean sprouts. I also didn’t bother with the coriander or fresh basil, but you can definitely adapt the spring rolls to your own tastes.

I cooked all my ingredients in a wok, having already softened my vermicelli noodles with boiling water. After they cooled, I wrapped them in spring roll paper, which you can find at many grocery stores. I find my spring rolls cook better if I let them chill for a bit in the freezer, so I put them in the freezer for about 30 minutes before frying.

Next, assembly! Soften your vermicelli noodles with boiling water, drain, and then place it on a plate, add your carrot, cucumber and lettuce on top, followed by the meat. Next, garnish with green onion rounds and peanut. Chop op your spring rolls and serve them on the noodles and spoon a couple tablespoons of nuoc cham onto your dish. You’ve reached the finish line! If you like, add some hoisin sauce to your dish for a bit of sweetness.

Enjoy!!

Drunken and Bruised…

Sorry… that title does not allude to any juicy tales of what may or may not have happened to me last night… it actually describes the two dishes that are the subject of today’s entry.

Over the past couple months, I’ve been obsessing over the show Masterchef Australia. It’s got a great format, and is the only cooking reality TV show that I can stand for more than one episode. Even though I only caught the season half way, there are tons and tons of food ideas and food preparation techniques that I have picked up from the show, some of which I have already put into use, and others that I have added to my ever growing food bucket list.

The meal I made today is one that I had been dying to make ever since I saw it on the show. Drunken Chicken with Bruised Salad was a contestant’s recipe that was so loved by the judges that they asked him to make it again, and added it to the show’s repertoire of recipes. I guess I was excited to make it because it has been a long time since I have used ingredients that were completely new to me. It’s also kind of shown me that though I know a lot about food… I still have a helluva lot to learn.

This was quite an easy dish to make… the most difficult part was running around town to find all the ingredients. Because this dish is Asian-inspired, I’m sure people in the west who don’t live in relatively big cities might have some difficulty tracking down the tougher ingredients, like the gula melaka (Indonesian palm sugar), dried shrimp, and shaoxing.

The meal was very well-received by my family, though they were a bit apprehensive at the appearance of the food. There are a few adjustments I’d make to the recipe….

For the chicken, I’d definitely add in a bit more ginger… a 6 cm piece, if not 8 cm.

As for the salad…

1. I’d cut the snake beans into 2cm pieces, 3cm max. 4cm was just too long.

2. I’d add in a little more palm sugar to the dressing. I found my dressing to be really acidic. The limes here in Cambodia tend to pack a lot of punch and flavour, but if you are using bottled lime juice or limes that are not in season, you might not have that problem. When I made it, I put in an extra two tablespoons of sugar, and that balanced things out quite well.

3. I only put in 3 tablespoons of fish sauce for a doubled recipe. Fish sauce just tends to be really salty, depending on where it’s from, so be careful.

Overall, as I said this meal was quite a success. I really, really liked the salad, as the only thing that wasn’t on point was the length of the snake beans. I’m already looking forward to making it again, as soon as I find a seller at the local market who doesn’t gouge me when I try to buy dried shrimp….

Back to Bread….

Well, I’ve had a rather long hiatus. Mostly due to my own laziness. I blame it on the heat. I’ve skipped continents again, and am now writing from Phnom Penh, Cambodia. Yes, that’s in Asia.

My location has a lot to do with the theme of this entry. Having spent considerable amounts of time in two different Asian countries, and conversed with many an expat, I’ve come to the conclusion that proper whole wheat bread is really hard to find in this corner of the globe. The whole concept of eating bread, as opposed to rice or noodles or root veggies is still relatively new to  Cambodians, and so the selection around town is pretty dire.

Most Cambodian bakeries I have frequented don’t bake anything remotely similar to whole wheat bread. Some expat-minded grocery stores have what we’d call in North America 60-40… a mix of white and whole wheat flour. So, unless you are willing to cross town and dish out an extra dollar or two for a whole wheat loaf at a European bakery, you’re more or less stuck.

Enter our breadmaker. Now, we’ve had this little Panasonic bread maker for a couple of years, ever since a family friend moving back to the U.S. gave it to us, as they could no longer use it because of the difference in electric current. Despite my mother’s excitement, it sat unused in a pantry under our stairs for two years. Who could blame her? We were spoiled in Europe, as good fresh bread was basically a staple at our local grocery store.

Our move to Cambodia finally put us in such a desperate, breadless situation that I decided to see what this whole breadmaker thing was about. I’m still experimenting a lot with bread, and trying to understand the relationship between salt, sugar and yeast, so I’m not quite ready to start inventing my own stuff. I’m not quite ready for the heartbreak of an unleavened loaf just yet.

I found this great basic recipe on allrecipes.com, and tweaked it a little. I bought wholemeal grains… basically the ‘wheat’ part of whole wheat flour that you would usually buy in the west, and mixed it in with white flour to create whole wheat flour. I put in about 1.5 cups of wholemeal and then add in white flour until I have 3 cups of the mix. This usually comes to about 425-450g, which is important because you need to have the right amount of yeast, and because breadmakers usually have a maximum amount of flour you can put in. Ours has a max of 500g.

Anyway, the bread was a success! It’s very soft, slices well, and is great as sandwich bread. I usually make a loaf or two a week, depending on how fast my family eats it. I have to say, as a foodie, the most exciting part of baking the bread is the smell that fills the kitchen… and of course, cutting that first slice of the loaf. Yum yum!

In time, I want to try my hand at brioche and foccacia. Stay tuned for more breads soon, I hope.

Bruschetta….

Another family staple in my house is bruschetta. You can’t go wrong with tomatoes, garlic, olive oil, balsamic vinegar and some fresh bread. Throw some cheese on it, and you’ve got a pretty filling sandwich alternative.

The recipe I used to use for bruschetta is sadly no longer online… or if it is, I can’t find it….

I’m horrible at writing down quantities, I just kind of chuck everything into a pan until it tastes right, but here’s my best effort:

Ingredients:

-1 baguette/focaccia bread

-4 cloves garlic (I always double this)

-1 /3 cup olive oil (extra virgin is best!)

-1 teaspoon balsamic vinegar

-1 tbsp chopped fresh basil

-Salt and black pepper to taste

-700g roma tomatoes, chopped

Directions:

1. Mince or crush the garlic and add it to the olive oil, set aside.

2. Slice the baguette into 1.5cm slices.

3. Brush the slices with some of the olive oil/garlic mixture. Make sure to reserve 1 tbsp.

4. Put the bread slices oil side up on the top rack of the oven, and broil until the bread browns a bit. This should take about 5 minutes, depending on the oven. You just want to dry the bread enough so that it’s not soggy when you put the tomatoes on it. Be careful not to burn the bread!

5. In the meantime, put the remaining olive oil and tomatoes, balsamic vinegar  into the pan on medium heat. Add in the balsamic vinegar and  basil, mixing the ingredients with a wooden spoon. Add salt and pepper to taste. Cook the tomatoes until they have softened a bit, no more than 5 minutes.

6. Spoon the tomato onto the bread slices and serve. Alternatively, you can put the bruschetta back in the oven after you’ve put the tomatoes on, and sprinkle it with some finely grated parmesan or some other low-moisture Italian cheese of choice.

These days I’m trying to stay away from bread, but I still love tomatoes, so I often prepare tomatoes bruschetta style to serve as a side dish. Here they are, and the next time I make proper bruschetta, I’ll add the pic.

Blueberry Orange Bran Muffins

More muffins!

Yup, I never get tired of making muffins and cookies! I found this recipe on allrecipes.com the other day when I was looking for a blueberry bran muffin recipe. Normally, I’d go look for one our standard recipes from the cookbook, but when your stuff’s in a ship, you’re forced to broaden your horizons.

I was excited to try this recipe because it involved orange juice and orange rind, which I rarely bake with. Nothing disastrous to report, the recipe was very straightforward. I added some frozen (and floured) cranberries to the blueberries just to mix things up a bit.

The muffins turned out quite well, and I was pleased with how moist they were. The moisture from the juice made the muffins seem richer than they were. The only thing I’d like to improve on are the muffins’ appearance… I want to tweak things a bit so that they rise a little and have that nice, rounded muffin shape, instead of being flat.

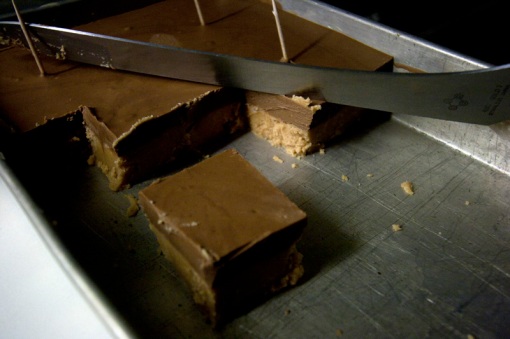
Peanut butter squares

These squares are pretty dangerous. Although I don’t have the exact recipe on hand (I’ll post it when I do!), I know it involves icing sugar, peanut butter, milk chocolate and more icing sugar. I’ve seen variations of this recipe that involve graham cracker crumbs or Rice Krispies, but I like this one because it’s basically like eating a Reese’s peanut butter cup. I haven’t even tried to figure out the calorie count per serving because I know if I do I’ll probably never eat one again. Fortunately, it doesn’t cost you anything to look at them!

Chicken Saté

To even out the spread, we included a couple chicken dishes in our menu. One dish that is pretty popular in The Netherlands is saté, and it’s pretty common fare at Indonesian restaurants and street food stalls. I’ve made different variations of ‘chicken-on-a-stick’ in the past, but this was my first time making it southeast Asian style. I decided to branch out of my usual Martha Stewart/Jamie Oliver recipe niche and went with a popular recipe on foodnetwork.com.

I didn’t have any coconut milk, nor did I have any low-sodium soy sauce or chicken stock, so I didn’t use them in my marinade. The chicken fortunately was not very salty, despite the fact that I ended up with more salt than called for. I marinated the chicken for about 3 days, not on purpose but because we didn’t end up serving it at the party because we had so much food!

As for the dipping sauce, we just bought some packaged peanut sauce to make our lives a little easier. To spice it up, we just threw in a few chili pepper rounds as we heated up the sauce.

Vietnamese Spring Rolls

I feel like I don’t even need to do a blog entry on these. Vietnamese/Thai/Southeast Asian raw spring rolls are one of those food items that I have started seeing everywhere, in random Asian fusion restaurants and at health food/vegetarian places. In any case, these ones are super easy. We got the guidelines for these rolls from the Australian delicious. mag, but basically just freestyled it. I’ll post the exact recipe when I’m reunited with it, but you can just Google ‘Vietnamese spring rolls’ if you’re dying to make it before then.

We used vermicelli, red peppers, cucumber, green onion, crushed peanut, mint and carrots to fill the rice paper. You can adjust the ingredients to suit your tastes, and add spiced ground pork if you want to make it a little more filling.

For dipping sauce I made nuoc cham, a basic dipping sauce for Vietnamese food. The toughest part of this recipe was dealing with the rice paper. Store your rice paper properly! If not they will end up with all kinds of cracks and tears, which make them a nightmare to work with.

Next to making deviled quail eggs, this was probably the most frustrating and annoying cooking experience I’ve had in a while. Don’t be put off though—like I said, if you treat your paper well, things will be alright. The spring rolls went over quite well—the vegetarians enjoyed them, and people who aren’t ‘into Asian food’ can easily handle the simple dish. Had the process not been so frustrating, I would’ve definitely made more!

Something Russian…

A couple weeks ago when we started to plan our party, we started looking for new recipes to try. Of course, when it came to cute hors d’oeuvres, Martha Stewart came to mind. I found a recipe for chive blinis. I’d never made a blini before, but the recipe was short-listed immediately because it looked relatively easy, and inexpensive.

It was a pretty straightforward recipe that even I couldn’t screw up. I tried my best to make my blinis perfectly round, but it was difficult given the fact that my poffertjes pan has somehow ended up in the trash.

Blinis on their own are a little weird… they look like a pancake, so when you eat them, you expect them to taste sweet, and they can kind of put you off a bit when they don’t. Fortunately, once you top them with something savoury, they are quite delicious.

I did a test run with some cream cheese and shoulder ham, and later I topped them with crème fraiche mixed with chives, smoked salmon and capers.

If I were to make this again, I wouldn’t use the capers because there is already enough salt in the salmon. If budget isn’t an issue, I’ll definitely go for the salmon roe and quail eggs.